In the world of interior architecture, brass is more than just a material; it is a “living” finish. Whether you have specified solid forged brass for a luxury kitchen or utilized high-performance PVD (Physical Vapor Deposition) handles for a high-traffic commercial project, the way you maintain these accents determines the longevity of your design’s aesthetic.
Brass handles are the “jewelry” of your cabinetry, but they are also the most frequently touched surfaces in a home. Over time, skin oils, kitchen grease, and atmospheric oxidation can dull their luster or create an uneven patina. To preserve the architectural integrity of your hardware, a disciplined approach to cleaning is essential.
Here is the professional’s guide to restoring and maintaining brass cabinet handles.
1. Identify Your Brass: The Critical First Step
Before applying any cleaning agent, you must determine what kind of brass you are handling. Treating a modern lacquer-coated handle like an antique “living” finish can result in permanent damage.
Lacquered/Coated Brass: Most modern handles (like those from Amerock or Liberty) feature a clear protective topcoat. This prevents tarnishing but can crack or peel if harsh chemicals are used.
Unlacquered/Living Brass: Favored by high-end firms for its “old-world” charm, this brass is designed to oxidize and change color over time.
PVD-Finished Brass: A high-tech finish common in 2026 manufacturing. It is incredibly durable and chemically bonded to the metal.
Plated Brass: A thin layer of brass over zinc or steel. Over-polishing can “burn through” to the base metal.
The Magnet Test: If a magnet sticks to your handle, it is likely brass-plated steel. If it doesn’t, it’s likely solid brass or a non-ferrous alloy.
2. The Gentle Method: Daily Maintenance
For 90% of cabinet hardware, the best cleaning solution is the simplest one. This method is safe for all finishes, especially lacquered and PVD handles.
The Process:
Solution: Mix warm water with a few drops of pH-neutral dish soap. Avoid “citrus” soaps, as the citric acid can eventually eat through protective coatings.
Application: Use a soft, lint-free microfiber cloth. Dip it in the solution, wring it out so it is damp but not dripping, and wipe the handles thoroughly.
Detailing: Use a soft-bristled toothbrush for intricate knurling or ornate carvings where grease accumulates.
Drying: This is the most important step. Water spots can etch into the finish. Use a separate dry cloth to buff the handle until it is completely dry and streak-free.
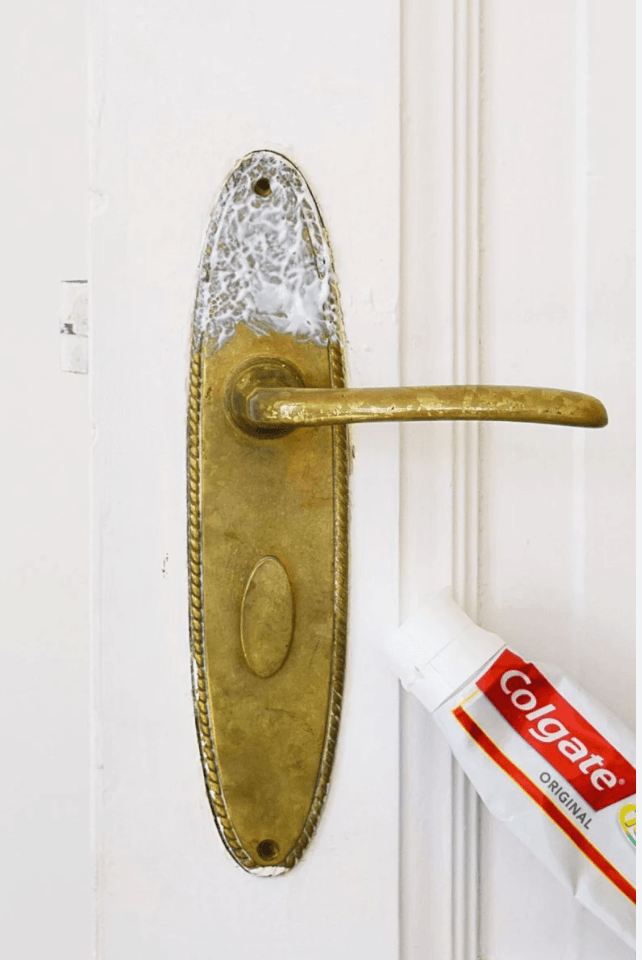
3. Deep Restoration: Cleaning Tarnish from Solid Brass
If you are working with unlacquered solid brass that has become excessively dark or “crusty” with verdigris (the green oxidation), you need a mild acid to break the bond.
The “Kitchen Chemist” Technique:
Lemon & Salt: Cut a lemon in half and dip the exposed side in fine table salt. Rub the lemon directly onto the brass. The acidity of the lemon dissolves the tarnish, while the salt acts as a gentle abrasive.
Flour, Salt, & Vinegar Paste: Mix equal parts into a paste. Apply it to the hardware and let it sit for 30 minutes. Rinse with warm water and buff dry.
A Note of Caution: Do not use these methods on lacquered handles. If the lacquer is still intact, the acid won’t reach the brass. If the lacquer is peeling, the acid will create unsightly “leopard spots” where the metal is exposed.
4. Professional Polishing: Achieving the “Mirror” Finish
If your design vision requires a high-gloss, reflective aesthetic, a chemical polish is necessary.
Commercial Polishes: Products like Wright’s Brass Cream or Brasso are industry standards. Apply a small amount to a cloth and rub until the tarnish turns black, then buff it away with a clean section of the cloth.
Micro-Abrasives: For architectural-grade hardware, consider a specialized polishing cloth pre-treated with rouge. These allow for a “dry polish,” which reduces the risk of chemical residue getting trapped in the wood grain of your cabinets.
5. Protection: Ensuring a Lasting Luster
Once your handles are clean, you want to prevent immediate re-oxidation.
Renaissance Wax: Used by museum curators and high-end foundries, this microcrystalline wax creates an airtight barrier. It is particularly effective for unlacquered brass in coastal environments or high-humidity kitchens.
Car Carnauba Wax: A high-quality automotive wax can provide a similar protective layer for domestic use, making future cleaning easier as oils will sit on the wax rather than the metal.
6. What to Avoid: The “Do Not” List
To maintain the professional look of your hardware, steer clear of these common mistakes:
Steel Wool/Scouring Pads: These will create micro-scratches that trap dirt and permanently dull the finish.
Ammonia-Based Cleaners: Ammonia can cause “stress corrosion cracking” in certain brass alloys over time.
Bleach: Never use bleach near brass; it can cause rapid, severe pitting and permanent discoloration.
Ultrasonic Cleaners: While great for jewelry, these can vibrate the protective lacquer off of cabinet hardware.
Final Thoughts for the 2026 Home
In modern interior design, we have moved toward “honest materials.” Whether you embrace the aging process of a living finish or prefer the permanent gold of a PVD coating, consistent maintenance is key. By spending five minutes a month on a gentle wipe-down, you ensure that your cabinet handles remain a testament to quality craftsmanship rather than a victim of neglect.